
A few weeks ago, Facebook rolled out 3D photos. If you want to use this feature, there are two options how to create and publish 3D Photo:
- If you have iPhone with dual lens, you take a picture in the “Portrait” mode and then upload it to Facebook and be done with it.
- You can create 3D photo manually in Photoshop. It is a lot of manual work, but it can be done, and the effect is very cool!
I will explain how to achieve this in the next few paragraphs!
How to create 3D photo without iPhone Portrait mode?
First and foremost I should say that you should be at a certain level of expertise in Photoshop. If you know how to work with Pen Tool, Gradient Tool, Quick Mask and Paths, it should be a relatively straightforward process for you. Besides, if you have ever used any web design software, the process won’t cause any difficulties. Most operations are standard. (Sponsored link)
Basically what we will be doing is manually creating a depth map which is something that dual lens phones create automatically in Portrait mode to determine what is background and foreground. This map is then used to blur the background to create the effect of a picture taken on a DSLR with portrait lens.
What Facebook is doing is they are using the same depth map, but this time not for a “DSLR effect” but to create an illusion of 3D photo.
Step 1. Pick a photo
Find the picture you want to create the 3D effect for. Ideally, it should be a vertical photo, let’s say 800×1000px.
What works best are photos where the objects are distinct and contrasting, and where at the same time the background isn’t too complicated – something uniform like a road, sky, beach or plain wall works great.
If the background displays complicated structures, it will be more noticeable that the 3D effect is only artificial.
Step 2. Start creating the depth map
What you need to know about depth maps before you get to it:
- The depth map is made of shades of gray (and you can use gradients as well).
- Prepare the depth map as a separate image with the same dimensions as the original.
- Every shade determines the distance of an object relative to the camera:
- dark shades = close,
- light shades = away.
Now here comes the hard part. You have to manually separate all the objects that you want to stand out in the 3D photo.
Selecting them with the Pen Tool and saving the path of each object is probably the quickest way to do that.
After that, determine what in the photo is at what distance and start creating the depth map according to the examples in this article by taking each path and filling it with the corresponding shade of gray.
Objects in the foreground will be darker, objects in the background will be a lighter color. If something is getting gradually further away (ground, ceiling, walls and so on), you can create a gradient instead of a solid color.
You can also slightly blur the edges in the depth map as in the example bellow.
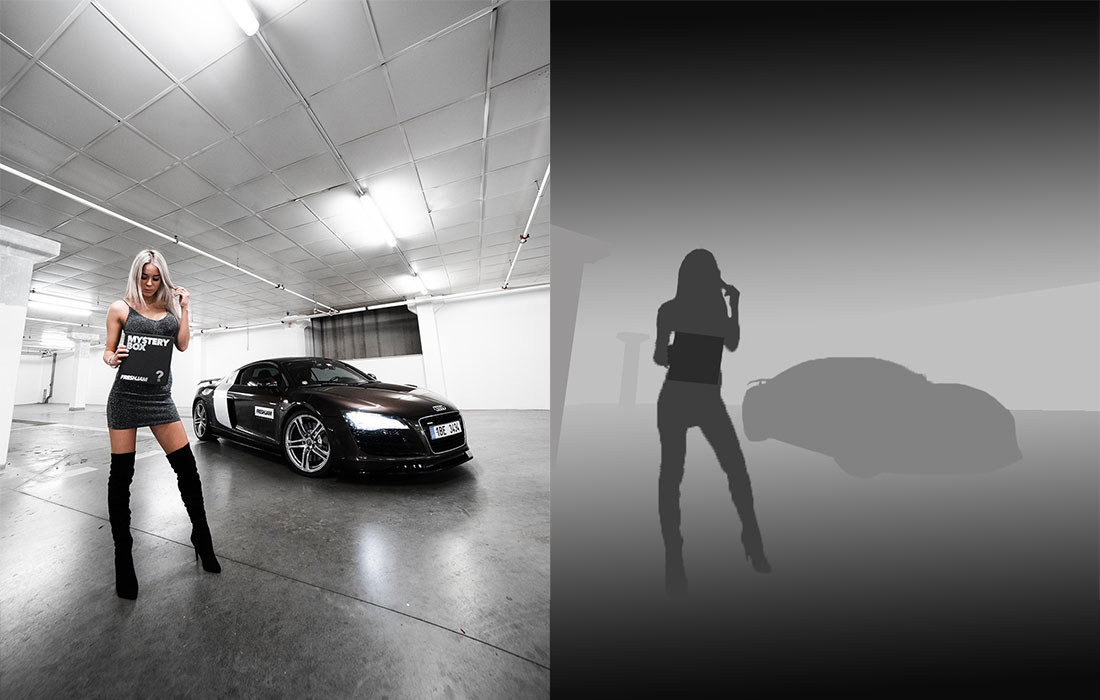
The cover picture and its depth map looks like this (see more examples at the end of the article):

Step 3. Test run it
Once you have the depth map done, save both original and the map into separate files (jpg, or whatever).
To quickly see if everything looks like it should, you can test the 3D effect on depthy.me. First load the original image and then it will ask for the depth map.
If you are happy with the result, you can proceed to the next step.
Step 4. Creating the file that you can upload to facebook
If everything looked okay on the depthy.me, you can create the 3D photo itself.
For that you can use the iOS app Depth Cam. The process is the same as on the website above: first load the original image, and then load the depth map separately by tapping on the Import DepthMap.
Finally, in the bottom right corner tap the export icon and select Save Facebook 3D Photo. That will create new picture in your Portraits album (which is where iPhone stores pictures taken in the Portrait mode by default).
How to post 3D photo on Facebook?
Now this is finally the easy part:
- Open the Facebook app
- Tap the text area to post new status
- Scroll down and select 3D Photo.
- Select the photo you just exported from Depth Cam.
This feature is (at least for now) only available on phones that support Portrait mode – all dual lens iPhones and Androids, and some newer phones such as the iPhone Xr.
More examples
We used this effect during this Black Friday weekend:
Original photo with depth map:

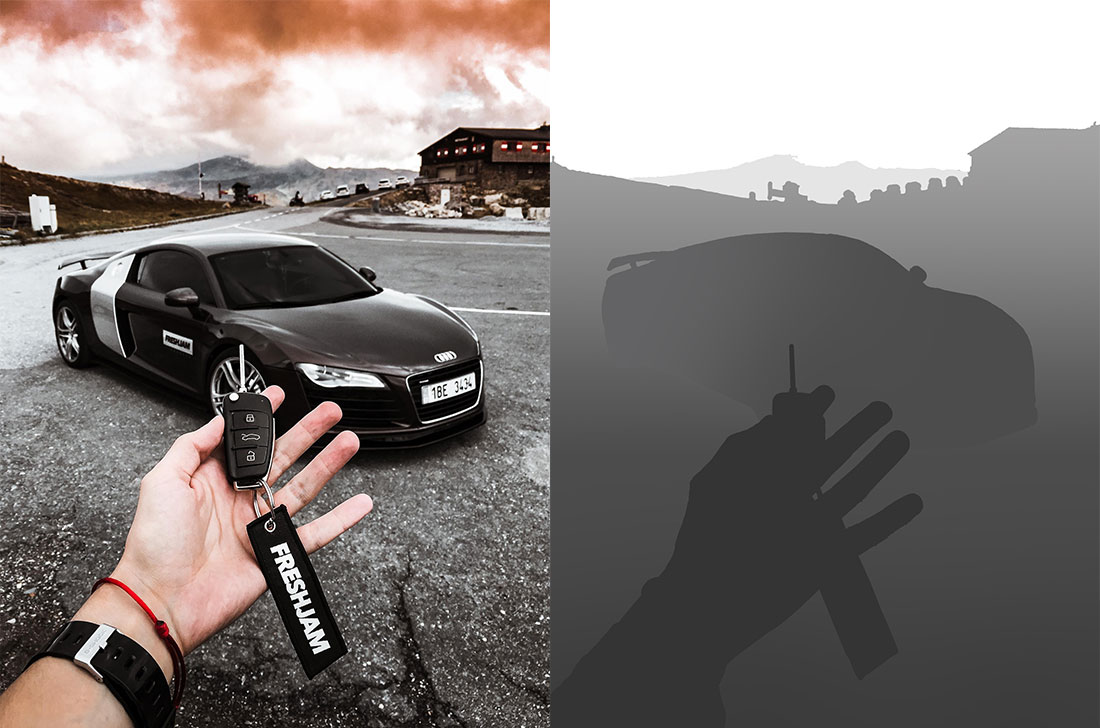
Original photo with depth map:
Original photo with depth map:
Have you tried creating 3D photo as well? Can you create great 3D photos or have you seen a really good one? Share them in the comments!